Swift 包管理器(Swift Package Manager)插件作者指南
Flutter 的 Swift 包管理器(Swift Package Manager)集成有许多优势
- 提供对 Swift 包生态系统的访问。Flutter 插件可以使用不断增长的 Swift 包生态系统!
- 简化 Flutter 安装。Swift Package Manager 已包含在 Xcode 中。未来,您将无需安装 Ruby 和 CocoaPods 即可针对 iOS 或 macOS。
如何开启 Swift 包管理器(Swift Package Manager)
#Flutter 的 Swift 包管理器(Swift Package Manager)支持默认关闭。要启用它:
升级到最新的 Flutter SDK
shflutter upgrade开启 Swift 包管理器(Swift Package Manager)功能
shflutter config --enable-swift-package-manager
使用 Flutter CLI 运行应用会迁移项目以添加 Swift Package Manager 集成。这将使您的项目能够下载您的 Flutter 插件所依赖的 Swift 包。启用 Swift Package Manager 集成的应用需要 Flutter 版本 3.24 或更高版本。要使用旧版 Flutter,您需要从应用中移除 Swift Package Manager 集成。
对于尚不支持 Swift Package Manager 的依赖项,Flutter 会回退到使用 CocoaPods。
如何关闭 Swift 包管理器(Swift Package Manager)
#禁用 Swift Package Manager 会导致 Flutter 为所有依赖项使用 CocoaPods。但是,Swift Package Manager 仍然与您的项目集成。要完全从项目中移除 Swift Package Manager 集成,请遵循如何移除 Swift Package Manager 集成的说明。
关闭单个项目的 Swift 包管理器(Swift Package Manager)
#在项目的 pubspec.yaml 文件中,于 flutter 部分下添加 disable-swift-package-manager: true。
# The following section is specific to Flutter packages.
flutter:
  disable-swift-package-manager: true
这将为该项目的所有协作者关闭 Swift 包管理器(Swift Package Manager)。
全局关闭所有项目的 Swift 包管理器(Swift Package Manager)
#运行以下命令
flutter config --no-enable-swift-package-manager这将为当前用户关闭 Swift 包管理器(Swift Package Manager)。
如果某个项目与 Swift 包管理器(Swift Package Manager)不兼容,所有协作者都需要运行此命令。
如何为现有 Flutter 插件添加 Swift 包管理器(Swift Package Manager)支持
#本指南展示了如何为已支持 CocoaPods 的插件添加 Swift Package Manager 支持。这可以确保插件可被所有 Flutter 项目使用。
在另行通知之前,Flutter 插件应同时支持 Swift Package Manager 和 CocoaPods。
Swift Package Manager 的采用将是渐进式的。不支持 CocoaPods 的插件将无法被尚未迁移到 Swift Package Manager 的项目使用。不支持 Swift Package Manager 的插件可能会给已迁移的项目带来问题。
在本指南中,将 plugin_name 替换为您的插件名称。以下示例使用了 ios,请根据适用情况将 ios 替换为 macos/darwin。
首先,在
ios、macos和/或darwin目录下的子目录中创建一个新目录。将此新目录命名为平台包的名称。plugin_name/ios/ ├── ... └── plugin_name/
在此新目录中,创建以下文件/目录
Package.swift(文件)Sources(目录)Sources/plugin_name(目录)
您的插件应如下所示
plugin_name/ios/ ├── ... └── plugin_name/ ├── Package.swift └── Sources/plugin_name/
在
Package.swift文件中使用以下模板Package.swiftswift// swift-tools-version: 5.9 // The swift-tools-version declares the minimum version of Swift required to build this package. import PackageDescription let package = Package( // TODO: Update your plugin name. name: "plugin_name", platforms: [ // TODO: Update the platforms your plugin supports. // If your plugin only supports iOS, remove `.macOS(...)`. // If your plugin only supports macOS, remove `.iOS(...)`. .iOS("13.0"), .macOS("10.15") ], products: [ // TODO: Update your library and target names. // If the plugin name contains "_", replace with "-" for the library name. .library(name: "plugin-name", targets: ["plugin_name"]) ], dependencies: [], targets: [ .target( // TODO: Update your target name. name: "plugin_name", dependencies: [], resources: [ // TODO: If your plugin requires a privacy manifest // (e.g. if it uses any required reason APIs), update the PrivacyInfo.xcprivacy file // to describe your plugin's privacy impact, and then uncomment this line. // For more information, see: // https://developer.apple.com/documentation/bundleresources/privacy_manifest_files // .process("PrivacyInfo.xcprivacy"), // TODO: If you have other resources that need to be bundled with your plugin, refer to // the following instructions to add them: // https://developer.apple.com/documentation/xcode/bundling-resources-with-a-swift-package ] ) ] )更新
Package.swift文件中的支持的平台。Package.swiftswiftplatforms: [ // TODO: Update the platforms your plugin supports. // If your plugin only supports iOS, remove `.macOS(...)`. // If your plugin only supports macOS, remove `.iOS(...)`. .iOS("13.0"), .macOS("10.15") ],更新
Package.swift文件中的包、库和目标名称。Package.swiftswiftlet package = Package( // TODO: Update your plugin name. name: "plugin_name", platforms: [ .iOS("13.0"), .macOS("10.15") ], products: [ // TODO: Update your library and target names. // If the plugin name contains "_", replace with "-" for the library name .library(name: "plugin-name", targets: ["plugin_name"]) ], dependencies: [], targets: [ .target( // TODO: Update your target name. name: "plugin_name", dependencies: [], resources: [ // TODO: If your plugin requires a privacy manifest // (e.g. if it uses any required reason APIs), update the PrivacyInfo.xcprivacy file // to describe your plugin's privacy impact, and then uncomment this line. // For more information, see: // https://developer.apple.com/documentation/bundleresources/privacy_manifest_files // .process("PrivacyInfo.xcprivacy"), // TODO: If you have other resources that need to be bundled with your plugin, refer to // the following instructions to add them: // https://developer.apple.com/documentation/xcode/bundling-resources-with-a-swift-package ] ) ] )如果您的插件有一个
PrivacyInfo.xcprivacy文件,请将其移至ios/plugin_name/Sources/plugin_name/PrivacyInfo.xcprivacy并取消注释Package.swift文件中的相应资源。Package.swiftswiftresources: [ // TODO: If your plugin requires a privacy manifest // (e.g. if it uses any required reason APIs), update the PrivacyInfo.xcprivacy file // to describe your plugin's privacy impact, and then uncomment this line. // For more information, see: // https://developer.apple.com/documentation/bundleresources/privacy_manifest_files .process("PrivacyInfo.xcprivacy"), // TODO: If you have other resources that need to be bundled with your plugin, refer to // the following instructions to add them: // https://developer.apple.com/documentation/xcode/bundling-resources-with-a-swift-package ],将任何资源文件从
ios/Assets移至ios/plugin_name/Sources/plugin_name(或子目录)。如果适用,请将资源文件添加到Package.swift文件中。有关更多说明,请参阅https://developer.apple.com/documentation/xcode/bundling-resources-with-a-swift-package。将所有文件从
ios/Classes移至ios/plugin_name/Sources/plugin_name。ios/Assets、ios/Resources和ios/Classes目录现在应该为空,可以删除。如果您的插件使用了 Pigeon,请更新您的 Pigeon 输入文件。
pigeons/messages.dartdartkotlinOptions: KotlinOptions(), javaOut: 'android/app/src/main/java/io/flutter/plugins/Messages.java', javaOptions: JavaOptions(), swiftOut: 'ios/Classes/messages.g.swift', swiftOut: 'ios/plugin_name/Sources/plugin_name/messages.g.swift', swiftOptions: SwiftOptions(),使用任何您可能需要的自定义项更新您的
Package.swift文件。在 Xcode 中打开
ios/plugin_name/目录。在 Xcode 中,打开您的
Package.swift文件。验证 Xcode 在此文件上是否没有产生任何警告或错误。如果您的
ios/plugin_name.podspec文件有 CocoaPodsdependency,请在您的Package.swift文件中添加相应的 Swift Package Manager 依赖项。如果您的包必须显式链接
static或dynamic(Apple 不推荐),请更新 Product 以定义类型。Package.swiftswiftproducts: [ .library(name: "plugin-name", type: .static, targets: ["plugin_name"]) ],进行任何其他自定义。有关如何编写
Package.swift文件的更多信息,请参阅https://developer.apple.com/documentation/packagedescription。
更新您的
ios/plugin_name.podspec文件以指向新路径。ios/plugin_name.podspecrubys.source_files = 'Classes/**/*.swift' s.resource_bundles = {'plugin_name_privacy' => ['Resources/PrivacyInfo.xcprivacy']} s.source_files = 'plugin_name/Sources/plugin_name/**/*.swift' s.resource_bundles = {'plugin_name_privacy' => ['plugin_name/Sources/plugin_name/PrivacyInfo.xcprivacy']}更新从 bundle 加载资源的方式,使用
Bundle.module。swift#if SWIFT_PACKAGE let settingsURL = Bundle.module.url(forResource: "image", withExtension: "jpg") #else let settingsURL = Bundle(for: Self.self).url(forResource: "image", withExtension: "jpg") #endif如果您的
.gitignore文件未包含.build/和.swiftpm/目录,则应更新您的.gitignore文件以包含:.gitignoretext.build/ .swiftpm/将您的插件更改提交到版本控制系统。
验证插件是否仍与 CocoaPods 兼容。
关闭 Swift 包管理器(Swift Package Manager)。
shflutter config --no-enable-swift-package-manager导航到插件的示例应用。
shcd path/to/plugin/example/确保插件的示例应用能够构建并运行。
shflutter run导航到插件的顶级目录。
shcd path/to/plugin/运行 CocoaPods 验证 lint。
shpod lib lint ios/plugin_name.podspec --configuration=Debug --skip-tests --use-modular-headers --use-librariesshpod lib lint ios/plugin_name.podspec --configuration=Debug --skip-tests --use-modular-headers
验证插件是否与 Swift 包管理器(Swift Package Manager)兼容。
开启 Swift 包管理器(Swift Package Manager)。
shflutter config --enable-swift-package-manager导航到插件的示例应用。
shcd path/to/plugin/example/确保插件的示例应用能够构建并运行。
shflutter run在 Xcode 中打开插件的示例应用。确保在左侧的 Project Navigator 中显示 Package Dependencies。
验证测试是否通过。
如果您的插件有原生单元测试(XCTest),请确保您也更新插件示例应用中的单元测试。
遵循测试插件的说明。
在本指南中,将 plugin_name 替换为您的插件名称。以下示例使用了 ios,请根据适用情况将 ios 替换为 macos/darwin。
首先,在
ios、macos和/或darwin目录下的子目录中创建一个新目录。将此新目录命名为平台包的名称。plugin_name/ios/ ├── ... └── plugin_name/
在此新目录中,创建以下文件/目录
Package.swift(文件)Sources(目录)Sources/plugin_name(目录)Sources/plugin_name/include(目录)Sources/plugin_name/include/plugin_name(目录)Sources/plugin_name/include/plugin_name/.gitkeep(文件)- 此文件确保目录被提交。如果目录中添加了其他文件,您可以删除
.gitkeep文件。
- 此文件确保目录被提交。如果目录中添加了其他文件,您可以删除
您的插件应如下所示
plugin_name/ios/ ├── ... └── plugin_name/ ├── Package.swift └── Sources/plugin_name/include/plugin_name/ └── .gitkeep在
Package.swift文件中使用以下模板Package.swiftswift// swift-tools-version: 5.9 // The swift-tools-version declares the minimum version of Swift required to build this package. import PackageDescription let package = Package( // TODO: Update your plugin name. name: "plugin_name", platforms: [ // TODO: Update the platforms your plugin supports. // If your plugin only supports iOS, remove `.macOS(...)`. // If your plugin only supports macOS, remove `.iOS(...)`. .iOS("13.0"), .macOS("10.15") ], products: [ // TODO: Update your library and target names. // If the plugin name contains "_", replace with "-" for the library name .library(name: "plugin-name", targets: ["plugin_name"]) ], dependencies: [], targets: [ .target( // TODO: Update your target name. name: "plugin_name", dependencies: [], resources: [ // TODO: If your plugin requires a privacy manifest // (e.g. if it uses any required reason APIs), update the PrivacyInfo.xcprivacy file // to describe your plugin's privacy impact, and then uncomment this line. // For more information, see: // https://developer.apple.com/documentation/bundleresources/privacy_manifest_files // .process("PrivacyInfo.xcprivacy"), // TODO: If you have other resources that need to be bundled with your plugin, refer to // the following instructions to add them: // https://developer.apple.com/documentation/xcode/bundling-resources-with-a-swift-package ], cSettings: [ // TODO: Update your plugin name. .headerSearchPath("include/plugin_name") ] ) ] )更新
Package.swift文件中的支持的平台。Package.swiftswiftplatforms: [ // TODO: Update the platforms your plugin supports. // If your plugin only supports iOS, remove `.macOS(...)`. // If your plugin only supports macOS, remove `.iOS(...)`. .iOS("13.0"), .macOS("10.15") ],更新
Package.swift文件中的包、库和目标名称。Package.swiftswiftlet package = Package( // TODO: Update your plugin name. name: "plugin_name", platforms: [ .iOS("13.0"), .macOS("10.15") ], products: [ // TODO: Update your library and target names. // If the plugin name contains "_", replace with "-" for the library name .library(name: "plugin-name", targets: ["plugin_name"]) ], dependencies: [], targets: [ .target( // TODO: Update your target name. name: "plugin_name", dependencies: [], resources: [ // TODO: If your plugin requires a privacy manifest // (e.g. if it uses any required reason APIs), update the PrivacyInfo.xcprivacy file // to describe your plugin's privacy impact, and then uncomment this line. // For more information, see: // https://developer.apple.com/documentation/bundleresources/privacy_manifest_files // .process("PrivacyInfo.xcprivacy"), // TODO: If you have other resources that need to be bundled with your plugin, refer to // the following instructions to add them: // https://developer.apple.com/documentation/xcode/bundling-resources-with-a-swift-package ], cSettings: [ // TODO: Update your plugin name. .headerSearchPath("include/plugin_name") ] ) ] )如果您的插件有一个
PrivacyInfo.xcprivacy文件,请将其移至ios/plugin_name/Sources/plugin_name/PrivacyInfo.xcprivacy并取消注释Package.swift文件中的相应资源。Package.swiftswiftresources: [ // TODO: If your plugin requires a privacy manifest // (e.g. if it uses any required reason APIs), update the PrivacyInfo.xcprivacy file // to describe your plugin's privacy impact, and then uncomment this line. // For more information, see: // https://developer.apple.com/documentation/bundleresources/privacy_manifest_files .process("PrivacyInfo.xcprivacy"), // TODO: If you have other resources that need to be bundled with your plugin, refer to // the following instructions to add them: // https://developer.apple.com/documentation/xcode/bundling-resources-with-a-swift-package ],将任何资源文件从
ios/Assets移至ios/plugin_name/Sources/plugin_name(或子目录)。如果适用,请将资源文件添加到Package.swift文件中。有关更多说明,请参阅https://developer.apple.com/documentation/xcode/bundling-resources-with-a-swift-package。将任何公共头文件从
ios/Classes移至ios/plugin_name/Sources/plugin_name/include/plugin_name。如果您不确定哪些头文件是公共的,请检查您的
podspec文件中的public_header_files属性。如果未指定此属性,则所有头文件都是公共的。您应该考虑是否希望所有头文件都公开。在
pubspec.yaml文件中定义的pluginClass必须是公共的,并且在此目录内。
处理
modulemap。如果您的插件没有
modulemap,请跳过此步骤。如果您正在使用
modulemap来让 CocoaPods 创建一个 Test 子模块,请考虑为 Swift Package Manager 移除它。请注意,这将使所有公共头文件都可以通过模块访问。要为 Swift Package Manager 移除
modulemap但保留给 CocoaPods,请在插件的Package.swift文件中排除modulemap和 umbrella 头文件。以下示例假定
modulemap和 umbrella 头文件位于ios/plugin_name/Sources/plugin_name/include目录中。Package.swiftswift.target( name: "plugin_name", dependencies: [], exclude: ["include/cocoapods_plugin_name.modulemap", "include/plugin_name-umbrella.h"],如果您希望将单元测试同时兼容 CocoaPods 和 Swift Package Manager,可以尝试以下方法:
Tests/TestFile.mobjc@import plugin_name; @import plugin_name.Test; #if __has_include(<plugin_name plugin_name-umbrella.h="">) @import plugin_name.Test; #endif如果您想为 Swift 包使用自定义
modulemap,请参阅Swift Package Manager 的文档。将
ios/Classes中的所有剩余文件移至ios/plugin_name/Sources/plugin_name。ios/Assets、ios/Resources和ios/Classes目录现在应该为空,可以删除。如果您的头文件不再与实现文件在同一目录中,您应该更新您的 import 语句。
例如,假设有以下迁移:
之前
     ios/Classes/
├── PublicHeaderFile.h
└── ImplementationFile.m
之后
     ios/plugin_name/Sources/plugin_name/
└── include/plugin_name/
   └── PublicHeaderFile.h
└── ImplementationFile.m
在此示例中,
ImplementationFile.m中的 import 语句应更新为:Sources/plugin_name/ImplementationFile.mobjc#import "PublicHeaderFile.h" #import "./include/plugin_name/PublicHeaderFile.h"如果您的插件使用了 Pigeon,请更新您的 Pigeon 输入文件。
pigeons/messages.dartdartjavaOptions: JavaOptions(), objcHeaderOut: 'ios/Classes/messages.g.h', objcSourceOut: 'ios/Classes/messages.g.m', objcHeaderOut: 'ios/plugin_name/Sources/plugin_name/messages.g.h', objcSourceOut: 'ios/plugin_name/Sources/plugin_name/messages.g.m', copyrightHeader: 'pigeons/copyright.txt',如果您的
objcHeaderOut文件不再与objcSourceOut在同一目录中,您可以使用ObjcOptions.headerIncludePath来更改#import。pigeons/messages.dartdartjavaOptions: JavaOptions(), objcHeaderOut: 'ios/Classes/messages.g.h', objcSourceOut: 'ios/Classes/messages.g.m', objcHeaderOut: 'ios/plugin_name/Sources/plugin_name/include/plugin_name/messages.g.h', objcSourceOut: 'ios/plugin_name/Sources/plugin_name/messages.g.m', objcOptions: ObjcOptions( headerIncludePath: './include/plugin_name/messages.g.h', ), copyrightHeader: 'pigeons/copyright.txt',运行 Pigeon 以使用最新配置重新生成代码。
使用任何您可能需要的自定义项更新您的
Package.swift文件。在 Xcode 中打开
ios/plugin_name/目录。在 Xcode 中,打开您的
Package.swift文件。验证 Xcode 在此文件上是否没有产生任何警告或错误。如果您的
ios/plugin_name.podspec文件有 CocoaPodsdependency,请在您的Package.swift文件中添加相应的 Swift Package Manager 依赖项。如果您的包必须显式链接
static或dynamic(Apple 不推荐),请更新 Product 以定义类型。Package.swiftswiftproducts: [ .library(name: "plugin-name", type: .static, targets: ["plugin_name"]) ],进行任何其他自定义。有关如何编写
Package.swift文件的更多信息,请参阅https://developer.apple.com/documentation/packagedescription。
更新您的
ios/plugin_name.podspec文件以指向新路径。ios/plugin_name.podspecrubys.source_files = 'Classes/**/*.{h,m}' s.public_header_files = 'Classes/**/*.h' s.module_map = 'Classes/cocoapods_plugin_name.modulemap' s.resource_bundles = {'plugin_name_privacy' => ['Resources/PrivacyInfo.xcprivacy']} s.source_files = 'plugin_name/Sources/plugin_name/**/*.{h,m}' s.public_header_files = 'plugin_name/Sources/plugin_name/include/**/*.h' s.module_map = 'plugin_name/Sources/plugin_name/include/cocoapods_plugin_name.modulemap' s.resource_bundles = {'plugin_name_privacy' => ['plugin_name/Sources/plugin_name/PrivacyInfo.xcprivacy']}更新从 bundle 加载资源的方式,使用
SWIFTPM_MODULE_BUNDLE。objc#if SWIFT_PACKAGE NSBundle *bundle = SWIFTPM_MODULE_BUNDLE; #else NSBundle *bundle = [NSBundle bundleForClass:[self class]]; #endif NSURL *imageURL = [bundle URLForResource:@"image" withExtension:@"jpg"];如果您的
ios/plugin_name/Sources/plugin_name/include目录仅包含一个.gitkeep,您应该更新您的.gitignore文件以包含以下内容:.gitignoretext!.gitkeep运行
flutter pub publish --dry-run以确保include目录被发布。将您的插件更改提交到版本控制系统。
验证插件是否仍与 CocoaPods 兼容。
关闭 Swift 包管理器(Swift Package Manager)。
shflutter config --no-enable-swift-package-manager导航到插件的示例应用。
shcd path/to/plugin/example/确保插件的示例应用能够构建并运行。
shflutter run导航到插件的顶级目录。
shcd path/to/plugin/运行 CocoaPods 验证 lint。
shpod lib lint ios/plugin_name.podspec --configuration=Debug --skip-tests --use-modular-headers --use-librariesshpod lib lint ios/plugin_name.podspec --configuration=Debug --skip-tests --use-modular-headers
验证插件是否与 Swift 包管理器(Swift Package Manager)兼容。
开启 Swift 包管理器(Swift Package Manager)。
shflutter config --enable-swift-package-manager导航到插件的示例应用。
shcd path/to/plugin/example/确保插件的示例应用能够构建并运行。
shflutter run在 Xcode 中打开插件的示例应用。确保在左侧的 Project Navigator 中显示 Package Dependencies。
验证测试是否通过。
如果您的插件有原生单元测试(XCTest),请确保您也更新插件示例应用中的单元测试。
遵循测试插件的说明。
</plugin_name>
如何更新插件示例应用中的单元测试
#如果您的插件具有原生的 XCTests,您可能需要更新它们以适应 Swift Package Manager,如果以下任一情况为真:
- 您正在为测试使用 CocoaPod 依赖项。
- 您的插件在
Package.swift文件中明确设置为type: .dynamic。
更新您的单元测试:
在 Xcode 中打开您的
example/ios/Runner.xcworkspace。如果您曾为测试使用 CocoaPod 依赖项(如
OCMock),请将其从您的Podfile文件中移除。ios/Podfilerubytarget 'RunnerTests' do inherit! :search_paths pod 'OCMock', '3.5' end然后在终端中,在
plugin_name_ios/example/ios目录运行pod install。导航到项目的 Package Dependencies。

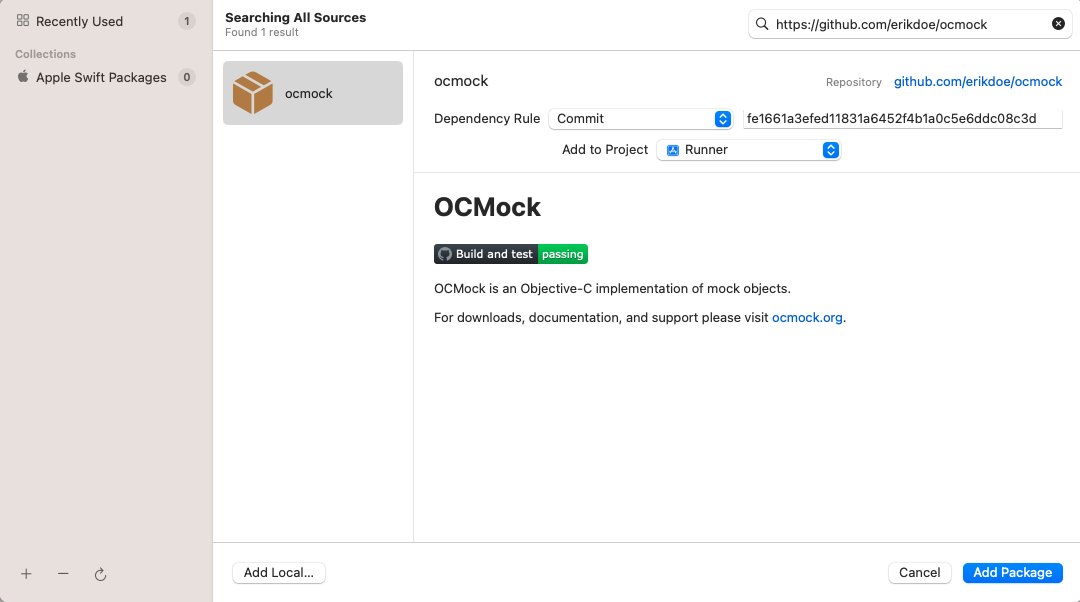
项目的包依赖项 点击 + 按钮,通过在右上角的搜索栏中搜索来添加任何仅用于测试的依赖项。

搜索仅用于测试的依赖项 确保依赖项已添加到
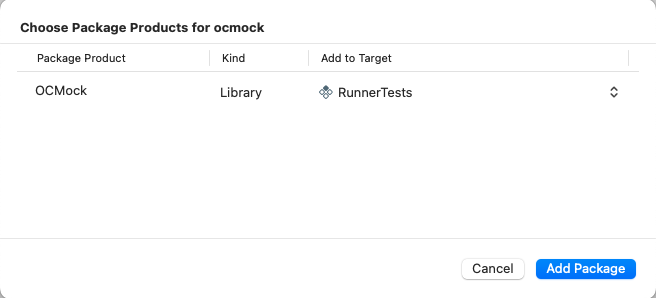
RunnerTestsTarget。
确保依赖项已添加到 RunnerTests目标点击 Add Package 按钮。
如果您已在
Package.swift文件中将插件的库类型显式设置为.dynamic(Apple 不推荐),您还需要将其添加为RunnerTests目标的依赖项。确保
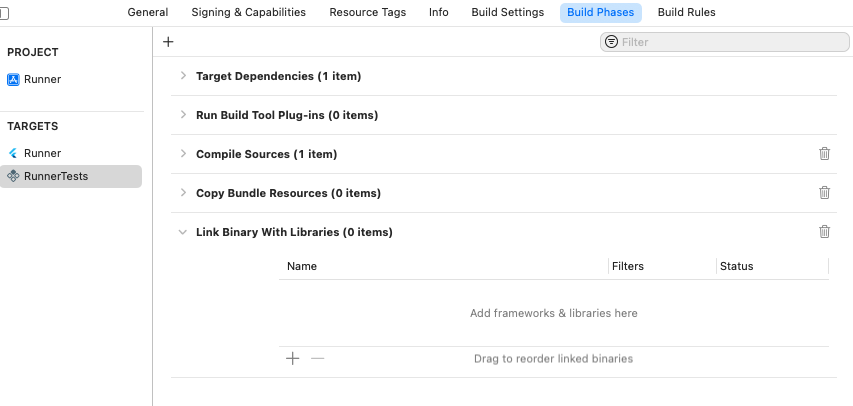
RunnerTests的 Build Phases 中有一个 Link Binary With Libraries 构建阶段。
RunnerTests目标中的Link Binary With Libraries构建阶段如果构建阶段尚不存在,请创建一个。点击 add,然后点击 New Link Binary With Libraries Phase。

添加 Link Binary With Libraries构建阶段导航到项目的 Package Dependencies。
点击 add。
在打开的对话框中,点击 Add Local... 按钮。
导航到
plugin_name/plugin_name_ios/ios/plugin_name_ios并点击 Add Package 按钮。确保它已添加到
RunnerTests目标,然后点击 Add Package 按钮。
确保测试通过 Product > Test。